
How to get complete KYC done for Mobikwik through Android app or website

Recent RBI guidelines for mobile wallets bring along with them a lot of restrictions on its usage. Probably the biggest pain is not allowing wallet to wallet transfer which many of us do for small amounts. Then sometimes you also might have reasons to load large amounts in your wallet which right now is not possible with non-KYC compliant due to RBI limiting it to Rs.10,000 only. So all in all, to get past these restrictions it is a good idea to get your KYC verification done once so you can use your Mobikwik wallet as you wish to.


What all you need

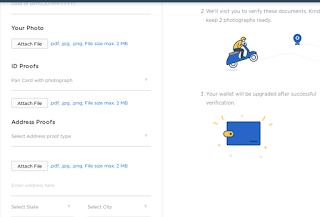
  1. Digital copy of your photographs, PAN card with your photo visible and an address proof.
  2. 2 passport sized photographs for physical verification along with the documents submitted digitally.

Where to start

  1. Go to Mobikwik website and log in to your account.
  2. Open the page: https://www.mobikwik.com/upgrade-wallet
  3. Here you need to enter your Date of Birth and upload your photo, PAN card, and an address proof.
  4. Enter the address as mentioned in the address proof. (Note: Mobikwik is servicing very few locations for completion of KYC formalities. If your city is not getting populated in the drop down then your location is not within the servicing range.)
  5. If you want the pick up location to be different from what is mentioned in your address proof then there is a checkbox which you need to select before entering the address for scheduling the verification meet up.
  6. Once these all details are filled and documents uploaded, just click on Submit to Wallet Upgrade.

That's all!

You should get a call within 1 or 2 days for scheduling an appointment at your mentioned address. Keep 2 photographs, PAN card and the address proof handy for quick completion of the verification. For any doubts or queries, use the comment section below.

Comments

Popular posts from this blog

How to configure your router for ION broadband

My D-Link router has a bad habit of getting automatically reset sometimes. Then there is the issue that the service guy says that they provide support for TP-Link or Belkin routers but not for D-Link routers. Anyhow, the number of times our router just decides to reset is quite a lot to inconvenience the poor guy each time and further, that would mean that I too have to wait for broadband service to get restored until the technician comes to my house to restore the settings. So I decided to take this task in my own hand and it was a definitely a good decision because all it takes is around 2-3 minutes to do these settings. 1. Log in to your router You can access the settings page of your router by logging into it. To do so, first, connect to the router through Wifi or through LAN. Once connected use the URL: "". If the router is new or has been reset, you should not be asked for a password. If asked, either you should know your username password com

Comparison between Airtel Digital and Sun Direct TV DTH providers

Sometimes it really get hard to compare DTH services, as we have got many. Today we have got so many DTH services that it is quite normal to get confused when it comes to buying one. But to get the best for you I have compared two popular DTH services and they are Airtel TV and Sun Direct TV. Both the services are good and reliable, but to choose the best we have to go through it in deep. Here we go :

Comparison between Dish TV and Sun Direct DTH services

Today we are able to see so many companies coming up with the service of digital signal television viewing and making the experience better than ever for you. So its becomes important to check out all the possible services, compare it and then choose the best. Here I will be comparing two DTH satellite services namely Dish TV and Sun direct TV. Such type of services have satellite TV packages which receive programming from dishes mounted on your roof and same goes for both of the above companies as well.