
How to get your Paytm account KYC verified

Paytm is the most used digital wallet in India right now and is now quite ingrained into the ecosystem of digital payments. After demonetization, it has got a very big boost and now even our local Kirana stores to office canteens accept payments through Paytm. However, recent RBI guidelines plan to bring a spanner into this seamless way of paying one another. All online wallets are now mandated to get the KYC of their users failing which the users won't be able to do wallet to wallet transactions nor will they be able to upload more than Rs.10,000 in their wallets within a specific month. Paytm has welcomed this guideline unlike many other smaller wallet operators and for the same has contract employed a large workforce to get the KYC done.


What do I need for Paytm KYC

  1. Aadhar card number
  2. PAN card

Steps to get Paytm KYC done


  1. Open your Paytm Android or iOS app.
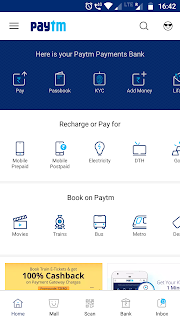
  2. In the top menu, you should be able to see a KYC button just between the Passbook and Add Money buttons.
  3. Once you click on the KYC button you should now be prompted for your Aadhar card number. Enter your Aadhar card number and check the Terms and Conditions before selecting the checkbox.


  • After clicking the Proceed button you will be asked a few more personal details like Nominee name, your occupation, Marital status and your address. Enter these details.
  • You should expect a call from Paytm representative for scheduling an appointment where your Aadhar based biometric verification will be done.

  • That's all!

    As soon as your biometric verification is done your Paytm account will be KYC compliant and you will have your own Paytm bank account along with your wallet limit renewed to Rs.1,00,000. You also won't have any issues in a wallet to wallet transaction. For any questions or queries please use the comment section below.

    Comments

    Popular posts from this blog

    How to configure your router for ION broadband

    My D-Link router has a bad habit of getting automatically reset sometimes. Then there is the issue that the service guy says that they provide support for TP-Link or Belkin routers but not for D-Link routers. Anyhow, the number of times our router just decides to reset is quite a lot to inconvenience the poor guy each time and further, that would mean that I too have to wait for broadband service to get restored until the technician comes to my house to restore the settings. So I decided to take this task in my own hand and it was a definitely a good decision because all it takes is around 2-3 minutes to do these settings. 1. Log in to your router You can access the settings page of your router by logging into it. To do so, first, connect to the router through Wifi or through LAN. Once connected use the URL: "". If the router is new or has been reset, you should not be asked for a password. If asked, either you should know your username password com

    Comparison between Airtel Digital and Sun Direct TV DTH providers

    Sometimes it really get hard to compare DTH services, as we have got many. Today we have got so many DTH services that it is quite normal to get confused when it comes to buying one. But to get the best for you I have compared two popular DTH services and they are Airtel TV and Sun Direct TV. Both the services are good and reliable, but to choose the best we have to go through it in deep. Here we go :

    Comparison between Dish TV and Sun Direct DTH services

    Today we are able to see so many companies coming up with the service of digital signal television viewing and making the experience better than ever for you. So its becomes important to check out all the possible services, compare it and then choose the best. Here I will be comparing two DTH satellite services namely Dish TV and Sun direct TV. Such type of services have satellite TV packages which receive programming from dishes mounted on your roof and same goes for both of the above companies as well.